Pages

Install f5 wireshark plugin f5ethtrailer.so on MacOS

The documentation I could find on F5 devcentral about installing the f5 wireshark plugin goes about compiling wireshark from sources, patching the code to include the f5 plugin, etc. After downloading the 2.2.0 version I could see that the plugin is already in binary format, namely f5ethtrailer.so (this goes for all platforms, except windows where this is a dll file).

To install the plugin in wireshark, you just need to figure what is the plugin directory (Wireshark -> About Wireshark (Folders tab) menu in MacOS). The copy the f5ethtrailer.so into the Global Plugins folder. (/Applications/Wireshark.app/Contents/PlugIns/wireshark/ in MacOS Sierra)

Then restart wireshark and double check the plugin is present by checking the menu Wireshark -> About Wireshark (Plugins tab)

Juniper "error: Could not create temporary directory"

Got into an issue a couple of days ago on a Junos EX virtual chassis where the following was being reporded

> show system snapshot media internal member 0
fpc0:
--------------------------------------------------------------------------
error: Could not create temporary directory
The command tries to create a temporary directory into the /tmp filesystem and it fails. Going to the shell prompt and trying to create a file there revealed the real issue (no inodes left; %iused = 100%):

% touch /tmp/a

/tmp: create/symlink failed, no inodes free
touch: /tmp/a: No space left on device

% df -hi /tmp
Filesystem    Size    Used   Avail Capacity iused ifree %iused  Mounted on
/dev/md17     126M     33M     83M    28%   16382     0  100%   /tmp
Looking at the number of inodes in use, we can see that they are filled up 100% and that there were just as many files in /tmp as inodes taken. To solve this and allow some space I deleted some (most) of these files from /tmp

% df -hi /tmp/
Filesystem    Size    Used   Avail Capacity iused ifree %iused  Mounted on
/dev/md17     126M    428K    115M     0%       7 16375    0%   /tmp

MacOS append search-domain

I recently started using a Mac laptop (with MacOS Sierra) for work and one thing soon saw was that the search-domains were not appended when trying to use utilities such as ping or ssh (tough the configuration in the network preferences lists domain.com in the list of search-domains).

So, saying I have host1.domain.com using the following:
ping host1 would not resolve host1 (no search-domain appended)
ping host1.domain.com would resolve host1 (is specified in FQDN)
host host1 would resolve host1 (but that's because host uses its own resolver that is using the search-domain)

Looking for manual page of mDNSResponder - the system wide DNS resolver - this says:

 
OPTIONAL ARGUMENTS
     mDNSResponder accepts the following optional arguments:

     -AlwaysAppendSearchDomains
                                Append search domains for multi-labeled Par-
                                tially Qualified Domain Name as well as sin-
                                gle-labeled Partially Qualified Domain Name.
                                This argument is not recommended because of
                                the extra DNS traffic it generates and its
                                adverse effect on battery life.
..
     To cause mDNSResponder to run with these optional arguments when it
     launches on OS X 10.11 (El Capitan) and later, set the
     AlwaysAppendSearchDomains or NoMulticastAdvertisements boolean keys to
     true in /Library/Preferences/com.apple.mDNSResponder.plist and reboot.

If you're a newb like me on MacOS, the next question is "how do I set the boolean key to true for AlwaysAppendSearchDomains? ". I found the answer here:

sudo defaults write /Library/Preferences/com.apple.mDNSResponder.plist AlwaysAppendSearchDomains -bool YES

Then, as the manual says, reboot. Bouncing the mDNSResponder would probably also work.

DDNS and QNAP NAS

I was looking recently to allow remote access into my home QNAP NAS from remote locations.
My IP address at home is dynamic so I needed a DDNS provider and some port forwarding on the home router.
My setup at home is simple. My internet connection is over a DSL line. I have a DSL router from the ISP serving as an Wifi access point for my devices at home. It also has 4 ethernet ports and to one of them I have my QNAP NAS connected.

After looking throgh a few reviews on the internet, I choosed DuckDNS. What i liked about it the most is their variety support in operating systems and the way the dynamic update is done - through an HTTPS GET request (can use also HTTP GET, but HTTPS is recommended). Secure and implemented in any decent OS. Full specs here.
You log in with one account from various social networks (reddit, G+, facebook, twitter) and you get a token assigned with your account. Further, at this time you can use 5 subdomains.

The QNAP itself can act as a DDNS client for a few providers. The whole list is below. Duckdns is not one of them.


To make use of duckdns on the QNAP NAS I've added in the /etc/config/crontab file an entry to update my IP every 2 hours:
 0 */2 * * * /share/Valentin/duckdns/duck.sh >/dev/null 2>&1

IS-IS notes

General:
- routing protocol for ISO CLNP (Connectionless Network Protocol)
- NET (Network Entity Title) required by configuration (L3 address) Has different formats. One practical is below:
   Area (1-13 bytes)| System ID (6 bytes) | Selector (1 byte) (eg. 47.000|1921.6810.0001|00)
   Selector is 00 in a NET. The NET must begin with one octet (eg 47) and end with one octed (00)
   Selector is non 00, the address is NSAP (Network Service Access Point)
   NSAP describes a service attachment at the network layer (similar to IP protocol at the IP layer)
- operates over Ethernet 802.2 LLC  (not over the common Ethernet II)
- dual ISIS (RFC1195) supports CLNS and IP
- hierarchical with 2 level hierarchy (L2 - core)
- ignores TLVs it does not understand


Adjacencies:
- L1 area ID must be the same

BGP notes

Neighbor states:

Idle: all connections are refused
Connect: wait for TCP to establish
Active: initiates the TCP connections
OpenSent: Local waits for Open message from peer. After receiving open, if no errors BGP sends keepalive
OpenConfirm: BGP waits for keepalive or notification
Established: Can exchange update, notification and keepalive

Message types:

Open: sent when TCP 3way is complete. Initiates the BGP session and contains details about BGP neighbor and supported and negotiated potions
Update: Transports routing information between BGP peers
Keepalive: On BGP level. Contains the BGP header and has no data.
Notification: sent when something is wrong (eg. unsupported options in the open message, hold time expires)
Refresh: BGP does not readvertise sent routes by default. Route refresh supports soft clearing of BGP sessions by allowing routes already sent to be re-advertised

BGP attributes:

- contained in the Update message, describes the prefixes in the message
- used to influence route selection and select best path

Local preference:
- exchanged by IBGP peers only
- used to set the exit path from the local AS

OSPF notes

Packet types:
Hello (type1): used to discover neighbors, build and maintain adjacencies
DBD(type2): database description packets. These are a summary of the topological database. Detects MTU mismatches (fragmentation is not allowed). Have bits I (start of DBD), M (more ackets DB), MS(master/slave used to decides who starts sending DBD first)
LSR(type3): link state request. Request specific link state advertisement (LSA) from a neighbor, typically after receiving DBD packets and noticing the local link state database is out of date
LSU(type4): link state updates. Advertises LSAs into the network . Can contain multiple LSAs
LSAck(type5): link state acknowledgements. Acknowledges LSUs

Packet formats:

OSPF packet:

Version | Type | Length | Router ID | Area ID | Cksum | Auth type | Auth data | Data

LSU packet (type 4):
Number of LSAs | LSA header | LSA data | LSA header | LSA data | ...

LSA header:
Age | Options | Link-state Type | Link-state ID | Advertising router | Seq number | Cksum | Length

LSA types:


Router LSA (type 1):
- has area scope
- describes local router
- standards LSA header  plus some extras (only a few showed below):
   - 5 bits set to 0 followed by bits 6,7,8  set for virtual links (V), ASBR (E), ABR (B)
   - number of links (2 bytes)
   - link ID (4 bytes)
   - link data (4 bytes)
   - link type (1 bytes)
   - metric (2 bytes)

 Link-type: Type 1 (P2P). Link ID: Neighbor Router ID. Link data: Local interface IP
 Link-type: Type 2 (Transit). Link ID: DR's interface IP. Link data: Local interface IP [broadcast segment]
 Link-type: Type 3 (Stub). Link ID: Network number. Link data: Subnet mask [passive interfaces, loopback interfaces]
 Link-type: Type 4 (Virtual link). Link ID: Neighbor Router ID. Link data: Local interface IP

Catfish fails to update database

I have just tried Catfish for local files search. I am using it (at time of writing version 1.2.2) with Debian Jessie  and Xfce desktop.
Every time I opened catfish I was prompted to update the database as it was never updated. I was updating this with administrative rights, but after closing and opening the application the same message was displayed.


From the message prompt catfish looks for the database in /var/lib/locate.findutils/locate.findutils.db.
The catfish utility is based on locate and find and the locate database is updated by the updatedb command.
The man page of updatedb for my debian system says:

       --output=dbfile
              The  database  file  to  build.  Default is system-dependent.  In Debian GNU/Linux, the default is /var/cache/locate/locatedb.

cli remote management of ESXi virtual machines over ssh

One of the ways to manage ESXi virtual machines is through vim-cmd commands. You can look at a quick tutorial of the command here.

Let's say there are a multitude of ESXi servers in your environment and you'd like to manage some virtual machines through cli.
One way to do this is to run vim-cmd commands over ssh. For example, I have 2 ESXis named in the example esxi1 and esxi2. On both of them I have one VM:
~$ ssh root@esxi1.localdomain "vim-cmd vmsvc/getallvms"
Vmid             Name                                         File                                  Guest OS       Version             Annotation
7      Linux                       [datastore1] Linux/Linux.vmx                                 debian6_64Guest    vmx-08

~$ ssh root@esxi2.localdomain "vim-cmd vmsvc/getallvms"
Password: 
Vmid           Name                                      File                                  Guest OS        Version             Annotation
13     VSRX                   [datastore1] VSRX/VSRX.vmx                                   otherGuest          vmx-09    VSRX OVF Template
So, this works fine and nice and actually there's nothing special about it. It's just running remote commands over ssh.

If you'd like to make things more easy, you can use ssh public key authentication for the remote esxi hosts (no need to type in the password every time you want to run a command).
I wrote some bash functions to make it even easier (to remember) and shorter to type.
This is what I have among other functions and things in my .bashrc file:
function start_vm () { ssh root@${1}.localdomain "vim-cmd vmsvc/power.on" "$2";}
function stop_vm () { ssh root@${1}.localdomain "vim-cmd vmsvc/power.off" "$2";}
function reboot_vm () { ssh root@${1}.localdomain "vim-cmd vmsvc/power.reboot" "$2";}
function getallvm () { ssh root@${1}.localdomain "vim-cmd vmsvc/getallvms" ;}
function powerstate_vm () { ssh root@${1}.localdomain "vim-cmd vmsvc/power.getstate" "$2";}
function getnetwrorks () { ssh root@${1}.localdomain "vim-cmd vmsvc/get.networks" "$2";}

How to remove Juniper ethernet encapsulation from pcap packet capture

When capturing packets on a Junos device, the output packet capture will include a Juniper ethernet header.
Example of such capture:


tcpdump -c1 -nvvr capture.pcap

reading from file JTAC.pcap, link-type JUNIPER_ETHER (Juniper Ethernet)

14:58:06.569634

 Juniper PCAP Flags [Ext], PCAP Extension(s) total length 16

   Device Media Type Extension TLV #3, length 1, value Ethernet (1)

   Logical Interface Encapsulation Extension TLV #6, length 1, value Ethernet (14)

   Device Interface Index Extension TLV #1, length 2, value 149

   Logical Interface Index Extension TLV #4, length 4, value 872

 -----original packet-----

     ARP, Ethernet (len 6), IPv4 (len 4), Request who-has 10.128.123.19 tell 10.128.123.254, length 28

To remove this header we need to chop the pcap [-C]  (in my case the first 22 bytes) , adjust the frame length [-L] and specify that the new frame type [-T] (ethernet in my case). I am using editcap version 1.12.1 and the default output type for the new pcap is pcapng. As I can see there's a problem when converting with this output type, so I am using libpcap as the output type.


editcap -C22 -L -F libpcap -T ether capture.pcap cap_libpcap.pcap


As you can see the Juniper ethernet header is  gone.


tcpdump -c1 -nvvr cap_libpcap.pcap

reading from file cap_libpcap.pcap, link-type EN10MB (Ethernet)

14:58:06.569634 ARP, Ethernet (len 6), IPv4 (len 4), Request who-has 10.128.123.19 tell 10.128.123.254, length 28

Recovering corrupted gzip files. gzip: compressed_file.gz: unexpected end of file


A tool to recover gzip corrupted compressed files is gzrecover. This comes with in the recovery toolkit package gzrt.

$gzip -d compressed_file.gz
gzip: compressed_file.gz: unexpected end of file

$file compressed_file.gz
compressed_file.gz: gzip compressed data, from Unix

$gzrecover compressed_file.gz
$ls compressed_file*
compressed_file.gz compressed_file.recovered

ssh tunnels set up and port forwarding

SSH tunnels allow you to forward a local TCP port to a remote machine and vice versa. The tunnel option is available in many ssh clients. I will give the example here on how to create SSH tunnels with putty and the openssh-client.
I will consider in the below that we want to access the SERVER on port 80 (http server).

Scenario 1. SSH tunnel setup with local port forwarding.


The SSH tunnel is shown with the red arrow. In order to access the SERVER through the ssh tunnel the connection will have to be made on the CLIENT's local forwarded port (2000 in the example). The traffic between the CLIENT and SSH-HELPER is encrypted by ssh, the traffic between the SSH-HELPER and the SERVER is not encrypted.

SSH tunnel  is set up on the CLIENT:
openssh-client:

ssh -L *:2000:server:80 ssh-helper

The '*' before the local port to be forwarded 2000 denotes that the port 2000 should be listening on all available interfaces on the client. This goes according to the openssh-client configuration.
putty:

The tunnel configuration is done under Connection - SSH - Tunnels. Source port is the local port, destination is where the connection will be forwarded after exiting the SSH tunnel.
After you specify source port and destination, you need to click "Add" for the configuration to take effect.
If you want to access the remote server from other hosts, make sure you check the box  "Local ports accept connections from other hosts", otherwise the port 2000 will be opened only for the loopback address (127.0.0.1)

Linux gnome add menu and desktop entry for applications


Users can create shortcuts for an application to appear in menus, desktop,  etc. by creating a .desktop file. This desktop file contains a listings of configuration for the application. In order for your desktop environment to "see" this file, this .desktop file will have to be placed either in /usr/share/applications - for system wide applications - or in ~/.local/share/applications - if the application should be available for a single user

Once the file is placed in this location the desktop uses this file to:


  • put the application in the Main Menu
  • list the application in the Run Application... dialog
  • create appropriate launchers in the menu or on the desktop.
  • associate the name and description of the application.
  • use the appropriate icon.
  • recognize the MIME types it supports for opening files.
Here's an example of a desktop file I have created for tinyCA application. I am running Debian Jessie and this application does not come with a any menu entries or desktop shortcut.

$ cat ~/.local/share/applications/tinyca2.desktop

[Desktop Entry]
Version=1.0
Type=Application
Name=TinyCA Certificate Authority
NoDisplay=false
Categories=Network;
Icon=security-low
Exec=/usr/bin/tinyca2
Terminal=false
Comment=TinyCA2 certificate authority
The entries one by one:

[Desktop Entry] - identifies the group name to which the desktop entry belongs. A group is name is enclosed in [ ] and there can be more than one group in a desktop file. [Desktop Entry] group is required by the basic desktop file entry
Version - version of the desktop entry specification. This field is not required

Connect Evolution email client to Exchange office365 server

Evolution is a personal information management application that provides integrated mail, calendaring and address book functionality.
To connect to office365 exchange you will need the evolution program and the evolution-ews plugin.

Installation:
% sudo apt-get install evolution evolution-ews
Account setup:
1. Obtain the information about your domain's office365 servers.
To find the exchange web services URL based on the verified answer on this office365 post:
-Logon to your e-mail account using Outlook Web App (OWA).
-Click Options > See All Options > Account > My Account > Settings for POP, IMAP, and SMTP access.
-In the list of entries, locate the server name. And the URL of exchange web service for your mailbox is the URL: "https://" + "Server name" + "/EWS/Exchange.amsx".
So, in my case the Exchange Web Services URL is https://outlook.office365.com/EWS/Exchange.asmx

2. In the evolution wizard enter the details.

Installing Debian wheezy from USB over serial console


I wanted to install Debian wheezy on a machine without a video card and no CDROM. I had a 1GB USB and I tried initially the easy way, as described in https://www.debian.org/releases/stable/amd64/ch04s03.html.en#usb-copy-isohybrid by just copying the cd image to my /dev/sda (USB stick) but I did not got any output on the console. I copied the iso file to another linux machine, mounted it as a loop device, made modifications in the isolinux.cfg file to redirect everything on the console, by adding the kernel parameters to look like below and then recreated the iso file but that still did not output anything on the serial console.

 isolinux.cfg
serial 0 9600
default install
prompt 0
timeout 100
label install
  kernel install.amd/vmlinuz
  append console=ttyS0,9600n8 initrd=/install.amd/initrd.gz --quiet
So I gave this up quite easy, and I took another approach. What I did next I followed the flexible way, as described in the debian documentation, but with some changes: 1/ I set up 2 partitions on the USB disk (/dev/sda in this example), both FAT16 (e code in fdisk), both 500MB and set the bootable flag on /dev/sda1 2/ pretty much followed the documentation and setup fat16 on /dev/sda1 and /dev/sda2:
mkdosfs /dev/sda1
mkdosfs /dev/sda2
3/ I installed the MBR on /dev/sda
install-mbr /dev/sda
4/ Installed the syslinux bootloader on /dev/sda1
syslinux /dev/sda1
5/ Copy the kernel and the initial ram image on /dev/sda1. This is done by mounting /dev/sda1 on let's say /mnt and the copying from the netinst cd vmlinuz and initrd.gz from the folder install.amd/ to /mnt (where I have /dev/sda1 mounted). Then I have created the syslinux.cfg file on /mnt according to the documentation and added the entries:

How to identify top traffic speakers with wireshark conversations

Among other very useful and interesting things that wireshark can show in a packet capture, it can also display the top traffic conversations based on various criteria such as IP addresses, L2 ethernet addresses, IPv6 address or L4 information.

The conversation list is available from the Statistics -> Conversations menu.


Below an example taken showing the top bps rate (B->A direction) for the TCP protocol, where A and B are the endpoints identified by IP and TCP port number 

ssh keepalives and tcp keepalives in openssh

The SSH connection can be kept alive either with SSH keepalive packets (encrypted) or with TCP keepalive packets. This allows also to detect hanging sessions and disconnect the hanging client/server when a connection has become inactive.

On a open SSH server, to control the SSH keepalive packets the parameters are:
ClientAliveCountMax 3 (default)
ClientAliveInterval 0 (default) - means the SSH keepalive packets will not be sent by the server

Replaying packets with tcpreplay

Tcpreplay is a suite of tools that allows editing and replaying previously captured traffic in libpcap format. This can come handy in many situations, one common use is traffic pattern based behavior re-creation in a lab environment.
Tcpreplay suite comes with the following tools:
  • tcpprep - multi-pass pcap file pre-processor which determines packets as client or server and creates cache files used by tcpreplay and tcprewrite
  • tcprewrite - pcap file editor which rewrites TCP/IP and Layer 2 packet headers
  • tcpreplay - replays pcap files at arbitrary speeds onto the network
  • tcpliveplay - Replays network traffic stored in a pcap file on live networks using new TCP connections
  • tcpreplay-edit - replays; edits pcap files at arbitrary speeds onto the network
  • tcpbridge - bridge two network segments with the power of tcprewrite
  • tcpcapinfo - raw pcap file decoder and debugger
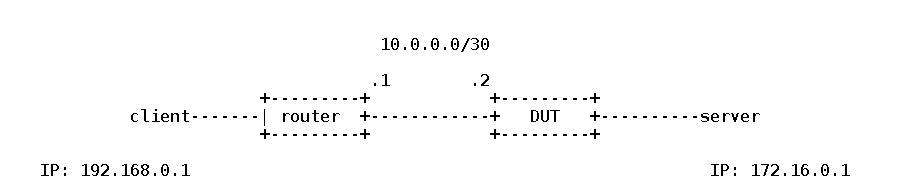
To exemplify the use of tcpreplay, let's say we have the following setup:
Now in this setup we're interested in how our DUT device (Device Under Test) is reacting given a specific traffic pattern that is let's say very specific to this environment. I will assume the DUT is a Layer 3 device. 

How to delete files from CSS11501

The scope of this post is to show how to delete archived files on a Cisco CSS11501. In order to delete other files (core dumps, logs, etc) the procedure is similar, you just need to know what you want to delete. In order to manipulate the files we need to go to debug mode:
CSS11501# llama
Then the ap_file command provides the "File commands using Complete pathnames". To delete the archived_rc_file from the Archive directory, issue:
CSS11501(debug)# ap_file delete c:/Archive/archived_rc_file
To see the files which are present in the Archive directory you can use the Tab after you type ap_file delete c:/Archive/ I am using the sg0820001 WebNS, and the dir - to list the contents of the Archive directory - command did not yeld any results when ran.
CSS11501(debug)# dir c:/Archive/
CSS11501(debug)#

mdadm tips on Linux software RAID

mdadm is a tool for managing, creating and reporting on Linux software RAID arrays.

I will describe some tips which I found useful at the moment.

Improve RAID1 re-sync time with write-intent bitmap

The RAID driver writes out periodically bitmap information recording which areas of the RAID component have been modified since the RAID array was last in sync.

If, for example one of two members of a RAID1 array fails and is removed from the array, md (the multiple disk software RAID drive) will record bits to the bitmap relating to the changes the active member is undertaking since the two members were last in sync. If the same failed/removed drive is re-added to the RAID1 array, md will notice and will recover only the portions indicated by the bitmap. In this way a lengthy re-sync is avoided (a full re-sync is normally needed if the drives are not in sync when the array starts up).